System DesignMay 11, 2026
Creating a Simple Incident Reporting System using RabbitMQ
by Audy Wallace Siegle
When you have multiple concurrent services communicate with each other, they often rely on one another to complete requests. This may work for small and stable environments but, it becomes fragile at scale. A sudden surge in traffic or an unexpected service failure can result in system wide outages.
This is where RabbitMQ comes to help.
RabbitMQ is an open-source message broker and streamer that implements the Advanced Message Queuing Protocol (AMQP). To put in simply, it is a software service that facilitate communication between different services.
Here are several reasons to integrate RabbitMQ:
- It decouples services. Instead of direct communication, services communicate using messages. This reduces interdependency (tight coupling) and enables services to operate independently. For instance, if one service fails, other services can continue to operate as messages are published to a queue and can be processed until the queue is empty.
- It performs well under heavy load. As messages are stored in a queue, RabbitMQ acts as a buffer between data producers and data consumers. During a sudden traffic spike, it enables data consumers to process messages at its own pace.
- It ensures reliable data delivery. RabbitMQ has features which enable services to retry if they failed to process a message.
In this article, I will demonstrate the implementation of RabbitMQ with a hypothetical scenario.
System Architecture
Imagine you are currently working in an Agricultural Company. It has 5 plantations employing approximately 2500 field workers. Due to strict regulatory requirements, the company must maintain records of all safety, equipment, and environmental incidents. Incidents are reported from remote field locations using a simple web form. Supervisors receive the reports through email.
Here is the issue with the current system:
- During peak reporting times, high volumes of concurrent submissions cause the web form to slow down, as it must wait for the email server to process each request sequentially.
- System outages or failed email deliveries result in permanently lost incident reports. Because the services communicate directly, there is no mechanism to temporarily store the report and retry sending it when the system recovers.
To solve this, we need to find a way to decouple reporting from email delivery.
Below is what our revised system will look like.
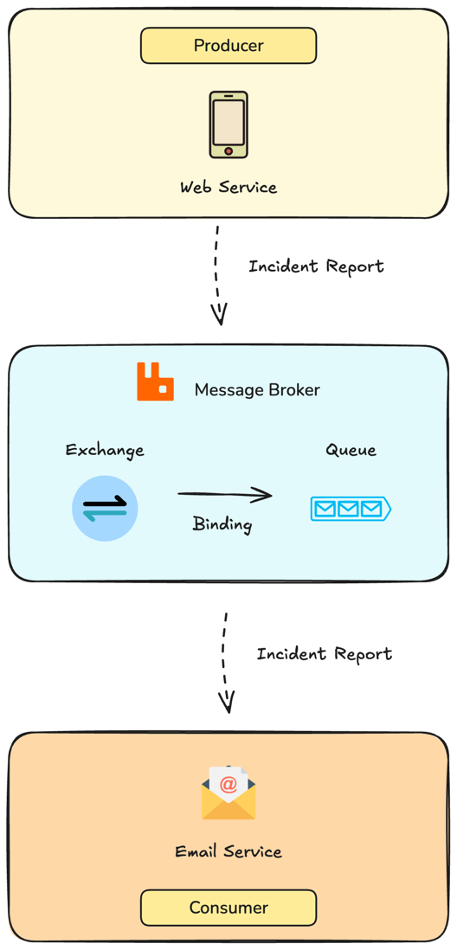
In our new system, you can see that the Web Service and the Email Service no longer speak directly to each other. Instead, they communicate through RabbitMQ, which acts as a reliable middleman.
Here is how an incident report gets sent in the new system.
- Web Service (Producer): This is where the data comes from. When a field worker submits an incident report, it gets sent directly to RabbitMQ. Because the system no longer waits for the email to actually send, the web application remains fast and responsive.
- Rabbit MQ (Message Broker): This is responsible for receiving, routing, and storing messages. At its core, RabbitMQ consists of three main parts:
- Exchange: It receives incoming messages (in this case, incident reports) and decides where they should go.
- Binding: This is the routing rule that connects the exchange to the appropriate queue.
- Queue: This is where the incident reports are stored until they are processed by the email service.
- Email Service (Consumer): The new role of the email service is to listen to the queue for incoming incident reports. The consumer processes the reports from the queue at its own pace and sends them to the supervisor, making it independent form the Web Service.
By introducing RabbitMQ, we have created a fault-tolerant system. Should the email server crash, the field workers can keep submitting reports, which will safely pile up in the Queue until the Email Service comes back online to process them.
Coding Implementation
Before we continue with the coding implementation, please ensure you have the following:
- Basic Knowledge: A foundational understanding of Python and Docker.
- Docker: Please have Docker installed on your machine, as it will make it much easier to set up and configure the development environment. (Note: You can grab Docker from the official website here).
*Disclaimer: The following implementation is meant for educational purposes only, do not follow it for actual production services.
Create project workspace
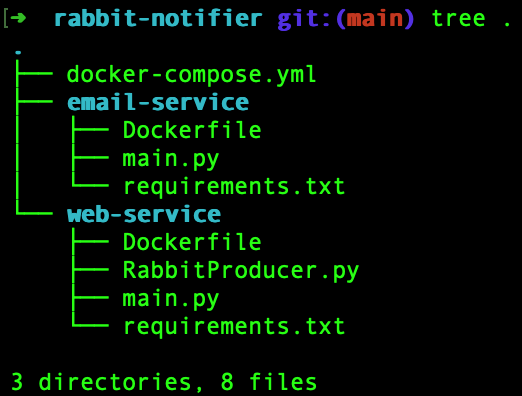
Now, let’s set up our workspace. We will be creating a main project folder containing a Docker compose file to run our services, along with two subdirectories: one for our Web Service and one for our Email Service.
Your final project structure should look exactly like this:
Docker Compose Setup
In the docker-compose.yml file add the following:
name: incident-report

services:
  rabbitmq:
    image: rabbitmq:4-alpine
    restart: always
    ports:
      - "5672:5672"
    environment:
      - RABBITMQ_DEFAULT_USER=pbc
      - RABBITMQ_DEFAULT_PASS=password
    volumes:
      - rabbitmq_data:/var/lib/rabbitmq

  web-service:
    build: ./web-service
    ports:
      - "3000:3000"
    command: ["uvicorn", "main:app",
              "--host", "0.0.0.0",
              "--port", "3000",
              "--reload"]
    depends_on:
      - rabbitmq
    volumes:
      - ./web-service:/app

  email-service:
    build: ./email-service
    depends_on:
      - rabbitmq
    command: ["python", "main.py"]
    volumes:
    - ./email-service:/app

volumes:
  rabbitmq_data:
Let’s break down what is in this compose file:
- rabbitmq: this service uses the lightweight version of the official RabbitMQ image.
- Port 5672 is exposed, which is the standard port services use to communicate with RabbitMQ via the AMQP protocol.
- We set up some basic credentials using environment variables.
- We mount a volume (
rabbitmq_data) to the container. This ensures that if our RabbitMQ container crashes or restarts, any unprocessed incident reports saved in the queue are safely stored on our machine and won't be lost.
web-service(The Producer): This service builds from theweb-servicedirectory we created.- It exposes port 3000 so we can access our web service.
- The
depends_ondirective tells Docker to wait and start RabbitMQ before starting this web service. - We also map our local
./web-servicefolder into the container. Additionally, using the--reloadcommand, means that any code changes made will instantly update the running server without needing a rebuild.
email-service(The Consumer): Just like the web service, this builds from its respective folder and depends on RabbitMQ. It runs a simple Python script (main.py) that will continuously listen for new messages.
Web Service Setup
For the web service, we won’t be building a full-blown web app. To demonstrate the RabbitMQ implementation, a simple REST API will suffice.
In the web service directory, create a Dockerfile and add the code below. It instructs Docker to set up the necessary python environment for our service.
FROM python:3.11-alpine

WORKDIR /app

ENV PYTHONDONTWRITEBYTECODE=1 \
    PYTHONUNBUFFERED=1

COPY requirements.txt .
RUN pip install --upgrade pip \
    && pip install --no-cache-dir -r requirements.txt

COPY . .

CMD ["python", "main.py"] # Will be overriden by commands in docker compose
Since the Dockerfile references a requirements.txt for package installation, we need to create one as well. Add the following dependencies to the requirements.txt in the web-service directory.
fastapi==0.128.1
uvicorn==0.40.0
pika==1.3.2
Here is a quick breakdown on the libraries that we are using:
- FastApi: a backend framework for building APIs
- Uvicorn: An asynchronous ASGI server to run our API
- Pika: The official Python Client for RabbitMQ
Next, we need to create a script to help us connect and publish messages to RabbitMQ. Add the following code in the RabbitProducer.py file.
import pika
import time
import json


class RabbitProducer:
    def __init__(
            self,
            host,
            port,
            username,
            password,
            max_retry=5,
            retry_delay=0.5):

        self._credentials = pika.PlainCredentials(
            username=username, password=password)
        self._parameters = pika.ConnectionParameters(
            host=host, port=port, credentials=self._credentials)
        self._max_retry = max_retry
        self._retry_delay = retry_delay
        self._connection = None
        self._channel = None

    def _connect(self):
        for _ in range(self._max_retry):
            try:
                print("Connecting to rabbitmq...")
                self._connection = pika.BlockingConnection(self._parameters)
                self._channel = self._connection.channel()
                break
            except Exception as e:
                print(f"Error connecting to rabbitmq: {e}")
                time.sleep(self._retry_delay)

        if self._connection is None:
            raise Exception("Failed to connect to rabbitmq.")

    def publish_message(self, queue_name, message):
        self._connect()
        try:
            self._channel.queue_declare(queue=queue_name, durable=True)
            properties = pika.BasicProperties(
                delivery_mode=2,
                content_type="application/json"
            )
            self._channel.basic_publish(
                exchange="", routing_key=queue_name, properties=properties, body=json.dumps(message))
        finally:
            self._channel.close()
            self._connection.close()
Here is what’s going on in the class:
- __init__: in the class constructor we store connection details (host, port, credentials) and retry logic (maximum attempt, delay between retries).
- _connect: This method is responsible for establishing a connection to RabbitMQ. When we use docker compose to start our system, all containers boot at the same time. Because RabbitMQ might require extra time to be available, the for loop in the method gives the web service a few chances to establish a connection, preventing it from crashing instantly at startup.
- publish_message: this method handles sending data to RabbitMQ. Whenever this method is invoked, it does the following
- Establish Connection: It starts a connection to RabbitMQ.
- Declare Queue: it creates a queue if it doesn’t exist. The durable argument ensures that the queue survives even when RabbitMQ restarts.
- Configure Message Properties: we configure the message properties with
delivery_mode=2to save our messages to disk and indicate that our message payload is in JSON format. - Publish: to publish our message, we will be using the default exchange, which routes the message to the queue we specified.
- End Connection: once published, our connection to RabbitMQ is safely closed.
Finally, we can create our REST API. In the main.py file add these following lines:
from fastapi import FastAPI, HTTPException
from pydantic import BaseModel
from RabbitProducer import RabbitProducer

app = FastAPI()

class Message(BaseModel):
  receiver: str
  data: str

@app.on_event("startup")
def startup_event():
  global producer
  producer = RabbitProducer(host="rabbitmq", port=5672, username="pbc", password="password")

@app.post("/publish-message")
def publish_message(request: Message):
  try:
    producer.publish_message("incident_report", dict(request))
    return {"status": "Message sent succesfully!"}
  except Exception as e:
    raise HTTPException(status_code=500, detail=f"Failed to send message: {e}")
Let’s breakdown what’s going on:
- Data Model: First, we create a base model for our incoming request. It expects a receiver (the email address of the supervisor) and data (incident details). This model enables our endpoint to validate the data in incoming payloads.
- Startup Event: At server startup we initialise a global instance of our RabbitProducer class.
- API Endpoint: we create one POST endpoint (/publish-message) to allow users to publish their incident reports. It routes incoming messages to the “incident_report” queue.
Email Service Setup
We just created a service for reporting, now we need a service to process those reports from the queue and send them through email to the appropriate stakeholder. This email service runs completely independently. It continuously listens to the queue and sends an email whenever a new message enters the queue.
Just like the web service, the email service also requires a Dockerfile and a requirements.txt file.
In the Dockerfile inside the email service directory add the following:
FROM python:3.11-alpine

WORKDIR /app

ENV PYTHONDONTWRITEBYTECODE=1 \
    PYTHONUNBUFFERED=1

COPY requirements.txt .
RUN pip install --upgrade pip \
    && pip install --no-cache-dir -r requirements.txt

COPY . .

CMD ["python", "main.py"] # Will be overriden by commands in docker compose
Next, add the following dependencies to the requirements.txt in the email service directory.
pika==1.3.2For the email service, we only need to install Pika since Python already has the necessary libraries to send emails.
Finally, let’s develop our “consumer”. Add the following code to the main.py in the email service directory.
import pika
import smtplib, json, time
from email.mime.text import MIMEText
import traceback

def send_mail(message):
    message_dict = json.loads(message)
    subject = "Site Incident Alert"
    receiver = message_dict["receiver"]
    body = message_dict["data"]

    # I'm using a temporary email service
    # Change the values of the variables below according to the service you're using
    smtp_host = "smtp.ethereal.email"
    smtp_port = 587
    username = "estelle.nikolaus9@ethereal.email"
    password = "26Crt1pGyPpjw91aRr"

    mail = MIMEText(body, "plain")
    mail["Subject"] = subject
    mail["From"] = username
    mail["To"] = receiver

    with smtplib.SMTP(smtp_host, smtp_port) as server:
        server = smtplib.SMTP(smtp_host, smtp_port)
        server.starttls()
        server.login(username, password)
        print("Sending mail....")
        server.sendmail(username, receiver, mail.as_string())

def main():
    try:
        credentials = pika.PlainCredentials(
            username="pbc", password="password")
        parameters = pika.ConnectionParameters(
            host="rabbitmq", port=5672, credentials=credentials
        )
        print("Connecting to rabbitmq...")
        connection = pika.BlockingConnection(parameters=parameters)
        channel = connection.channel()
        print("Connected Successfully!")
        channel.queue_declare(queue="incident_report", durable=True)
        def on_message_callback(ch, method, _, body):
            try:
                send_mail(body)
                ch.basic_ack(delivery_tag=method.delivery_tag)
            except Exception as e:
                 print(f"Error sending email: {type(e)}")
                 traceback.print_exc()
                 ch.basic_nack(delivery_tag=method.delivery_tag)

        channel.basic_consume(queue="incident_report", on_message_callback=on_message_callback)
        channel.start_consuming()
    except Exception as e:
        print(f"Failed to send email: {type(e)}")
        traceback.print_exc()

if __name__ == "__main__":
    while True:
        try:
            main()
        except Exception as e:
            print(f"Failed to execute email service: {type(e)}")
            traceback.print_exc()
            time.sleep(0.5)
Here is the breakdown of the code:
- The
send_mailmethod is responsible for connecting to an SMTP server and sending the email out to the receiver specified in the incident report. - In the main method, we establish a connection to RabbitMQ, declare a queue (in case it hasn’t been created), and start consuming messages from the
incident_reportqueue. - In the
basic_consumemethod we included a callback function which triggers oursend_mailfunction.- If the email sends successfully, we run the
.basic_ack()method to tell RabbitMQ that we have received the message and that it can safely delete it. - Should the email fail to send, the
.basic_nackmethod will run which tells RabbitMQ to place the message back to the queue so that it can be retrieved later.
- If the email sends successfully, we run the
Testing
With everything set up, it is time run our services.
In your terminal, navigate to the root of your project directory and run the following command.
docker compose up -d --buildThis command will build and start our containers in the background.
Now, let’s try to send a report using the web service API. Create a new POST request to the /publish-message end point.
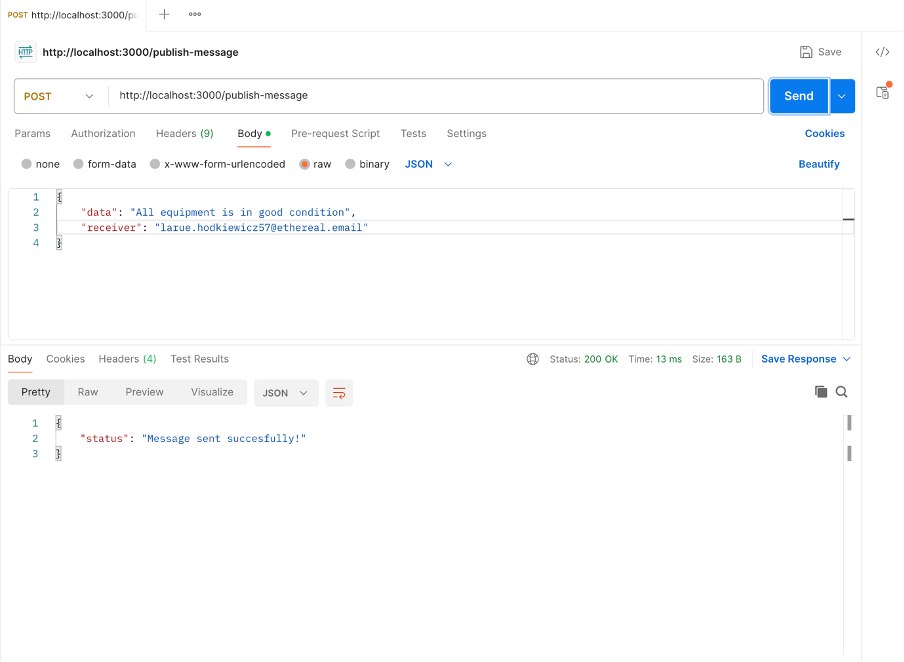
The server returns a 200-status code which means that our message is successfully published to our message queue.
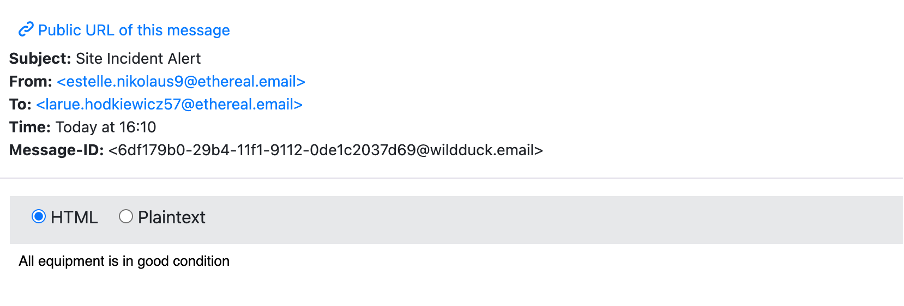
When we check our inbox, we can verify that our email-service was able to consume the message from the queue and forward the email to the receiver.
Now let’s see what happens when the email service is down. To simulate a system outage, we are going to intentionally stop the email service and try to send a message.
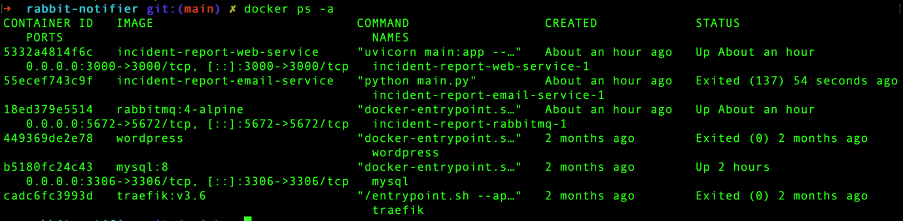
First, we need to find the container ID of our email service. In your terminal, list all available Docker containers by running:
docker ps -a
Copy the container id of the email service and stop the container using the command below.
docker stop <<CONTAINER-ID>>If you list the containers again, you can see that the email service has been exited.
Let’s go back to our web API and try to send another report while our email service is unavailable.
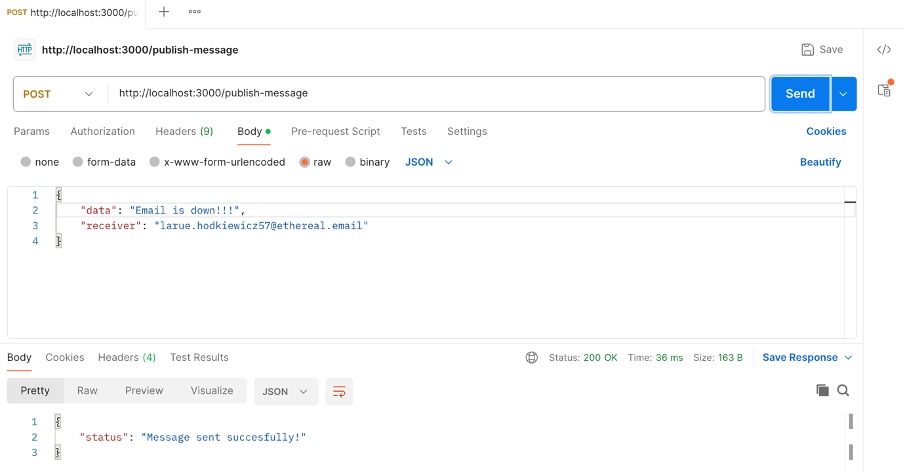
Notice that even when the email service is offline, we are still able to publish reports without issue. The web service hands over the report to RabbitMQ and the message is stored on disk, waiting for a consumer to process it.
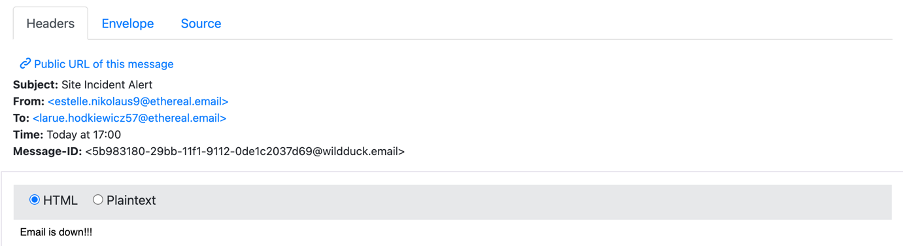
Let’s bring back our email service. Use the command below to start the email service container again.
docker start <<CONTAINER-ID>>As soon as the email service is available again, it connects to RabbitMQ and immediately processes the message in the queue.
Open your inbox to see that you have received the report.
Conclusion
In conclusion, we were able to transform a fragile system that was prone to losing crucial reports during server outages or during traffic spikes into a fault-tolerant system. The introduction of RabbitMQ as the message broker was pivotal in decoupling our services. Incident reports can be published instantly and stored safely in a queue until the email service is ready to process them. This producer and consumer pattern is an important concept when designing and developing reliable systems.
Thank you for reading, I hope this article can inspire you to explore message brokers and implement them to your own services.
You can grab the code in the link below.